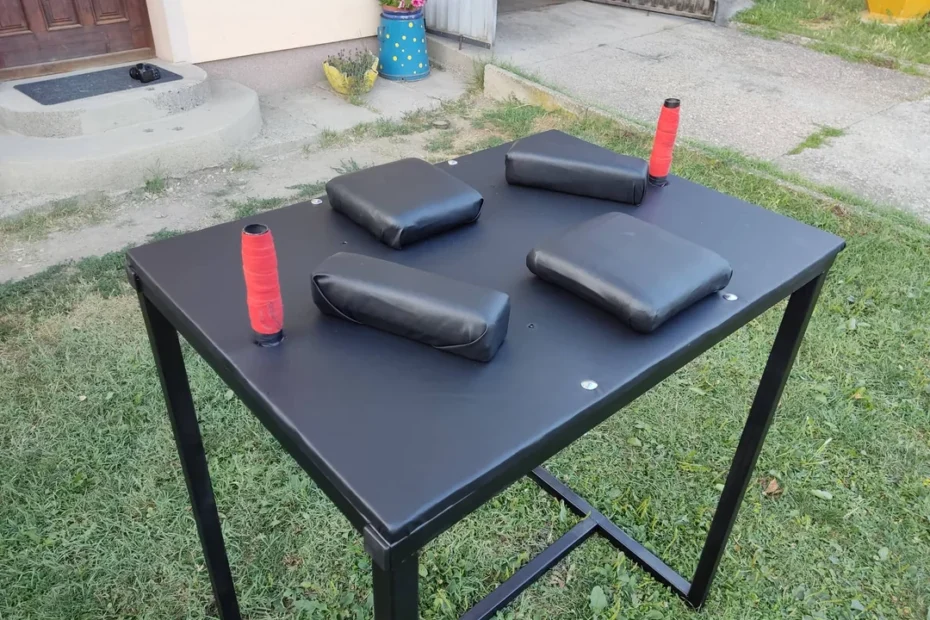
Are you ready to take your arm wrestling passion to the next level? Building your own arm wrestling table is not only a rewarding DIY project but also a surefire way to elevate your training and competitions. Whether you’re a seasoned arm wrestler or just starting out, having a custom table at your disposal can make all the difference in honing your skills and hosting epic showdowns. In this guide, you’ll discover the essential steps and materials needed to construct a professional-grade arm wrestling table that meets official standards. Get ready to roll up your sleeves and create the ultimate battleground for testing your strength and technique.
Materials Needed to Build an Arm Wrestling Table
To construct a professional-grade arm wrestling table, you’ll need to gather specific materials that meet regulation standards. Here’s a comprehensive list of components required for your project:
Table Structure
For the main structure, you’ll need steel components or scrap lumber. If opting for metal, consider using square tubing, tubular steel, flat iron, or angle iron, not exceeding 5.1 cm in diameter or width. For the tabletop, 1.9 cm thick plywood covered with foam and vinyl material is suitable.
Padding and Grips
You’ll need:
- High-quality foam material covered with vinyl for elbow pads (17.8 cm x 17.8 cm, 5.1 cm thick)
- Touch pad material for side pads (10 cm high, 25.4 cm long)
- Steel grips plated with nickel for hand pegs (2.5 cm diameter, 15.2 cm high)
Additional Components
Don’t forget:
- Bolts and an Allen key for assembly
- Abrasion-resistant leather to cover the tabletop
- Steel pipes covered with rubber for legs
- Materials for seats (45.7 cm square, placed 45.7 cm from the floor)
By using these materials, you’ll ensure your arm wrestling table meets professional standards and provides a safe, comfortable surface for competition.
Step-by-Step Instructions for Building Your Arm Wrestling Table
Preparing the Tabletop
Begin by constructing the tabletop according to official specifications. Cut a sturdy piece of wood to the recommended dimensions: 36 inches wide and 26 inches deep. Sand the edges for safety and apply a finish of your choice for durability.
Installing the Elbow Pads
Next, focus on the elbow pads. According to WAF guidelines, these should be 7 inches wide, 8 inches long, and 2 inches thick. Use high-density foam covered with leather or a similar material. Securely attach these pads to the tabletop, ensuring they are centered and aligned properly.
Adding Touch Pads and Hand Pegs
Install touch pads on either side of the elbow pads. These should be made of wood or plastic and measure 10 inches wide by 5 inches deep. Next, add hand pegs. These cylindrical grips should be 1 inch in diameter and 6 inches tall, positioned 16 inches apart.
Completing the Table
Finally, attach sturdy legs to your tabletop, ensuring the table stands at the correct height of 40 inches for a standard sit-down table. If desired, add seats on either side, aligning them with the table edge for proper positioning during matches.
Arm Wrestling Table Dimensions and Design Tips
When building your own arm wrestling table, adhering to standard dimensions and design principles is crucial for a professional and functional result. According to the World Arm Wrestling Federation, the table height should be 28 inches (71.1 cm) for sit-down matches and 40 inches (101.6 cm) for stand-up competitions. The tabletop width should measure 36 inches (91.4 cm) with a depth of 26 inches (66 cm).
Key Components
Your table should include square-shaped elbow pads measuring 7×7 inches (17.8×17.8 cm) and 2 inches (5.1 cm) thick. Touch pads, essential for determining match outcomes, should be 10 inches (25.4 cm) long and 4 inches (10.2 cm) high. Hand pegs, placed 13 inches (33 cm) from each edge, should be 1 inch (2.5 cm) in diameter and 6 inches (15.2 cm) high.
Material and Construction
For optimal durability, consider using square tubing, steel, iron, or high-quality plywood for your table’s construction. To ensure portability without compromising stability, incorporate removable legs using pipe fittings, tapered joints, or bolted connections. A truss-like bracing system can significantly enhance the table’s rigidity during intense matches.
Conclusion
As you embark on building your own arm wrestling table, remember that attention to detail and quality materials are key. By following the steps outlined in this guide, you’ll create a sturdy, regulation-compliant table that will serve you well for years to come. Not only will you save money compared to purchasing a pre-made table, but you’ll also have the satisfaction of competing on equipment you crafted yourself. Whether you’re a casual enthusiast or aspiring champion, a custom-built arm wrestling table is an investment in your passion for the sport. So gather your tools, measure twice, and get ready to build the centerpiece of your next arm wrestling showdown.


Pingback: Arm Wrestling: A Guide to the Sport of Steel Arms - sports to know